Pollinator Patches: What They Are, How to Start One, and Why They Work (Even with an HOA)
The short version
- A pollinator patch is a small, defined planting of native flowers that provides food and habitat for bees, butterflies, and other pollinators.
- Pollinator patches can be as small as 25 square feet. A single front-yard bed is enough to make a difference.
- Design matters more than size: clean edges, grouped plantings, and height layering keep pollinator patches HOA-conscious.
- Choosing regionally native plants ensures your patch supports local pollinators with minimal watering and maintenance.
A pollinator patch is a small, intentional planting of native flowers designed to feed and shelter bees, butterflies, hummingbirds, and other pollinators. Unlike a full meadow restoration or a wildflower scatter, a pollinator patch is defined, compact, and manageable, making it one of the most practical ways homeowners can support local ecosystems in a front yard.
The concept is simple: group native plants that bloom at different times into a clearly defined bed. Pollinators find the food they need. You get a low-maintenance planting that adds color and purpose to your yard. And when designed with structure in mind, a pollinator patch fits comfortably into HOA-conscious neighborhoods.
What is a pollinator patch?
A pollinator patch is a dedicated area (typically 25 to 200 square feet) planted with regionally native flowers, grasses, and shrubs that provide nectar, pollen, and habitat for pollinating insects and birds.
What separates a pollinator patch from a generic flower bed:
- Native plants: Species that evolved in your region and co-evolved with local pollinators
- Bloom diversity: Plants selected to flower across spring, summer, and fall so food is available all season
- Habitat layers: A mix of heights and growth forms: ground covers, mid-height forbs, and taller background plants
- Intentional placement: Grouped in a defined bed, not scattered randomly across the yard
A well-planned pollinator patch doesn't need to be large. Even a 5-by-5-foot bed with four or five native species can support dozens of pollinator species throughout the growing season.
Why pollinator patches matter
Pollinators (bees, butterflies, moths, beetles, and hummingbirds) are responsible for roughly one in three bites of food we eat. Native pollinators in particular are in decline across North America due to habitat loss, pesticide use, and the spread of non-native landscapes.
Residential yards represent a massive opportunity. According to the National Wildlife Federation, there are over 40 million acres of lawn in the United States. Converting even a small fraction to native pollinator habitat adds up to meaningful ecological impact.
A single front-yard pollinator patch can:
- Provide food for native bees that forage within a few hundred yards of their nest
- Offer host plants for butterfly species like monarchs and swallowtails
- Create stepping-stone habitat that connects fragmented green spaces
- Reduce the area of lawn you need to water, mow, and fertilize
How to start a pollinator patch
Starting a pollinator patch doesn't require a landscape architect or a full yard overhaul. Here's a practical, step-by-step approach:
1. Choose your spot
Most pollinator plants prefer full sun (6+ hours daily). Look for an existing bed you can convert, or claim a section of lawn near the front of the house. A strip along the driveway, a corner bed, or a foundation planting area all work well.
2. Define the edges
Before planting anything, create a clean border. Metal edging, stone borders, or a crisp spade-cut edge all signal intentional design. This single step is the most important factor in how your pollinator patch is perceived from the curb.
3. Select regionally native plants
Choose plants native to your specific region, not just "native to North America." Regional natives are adapted to your soil, rainfall, and temperature, which means less watering and fewer failures.
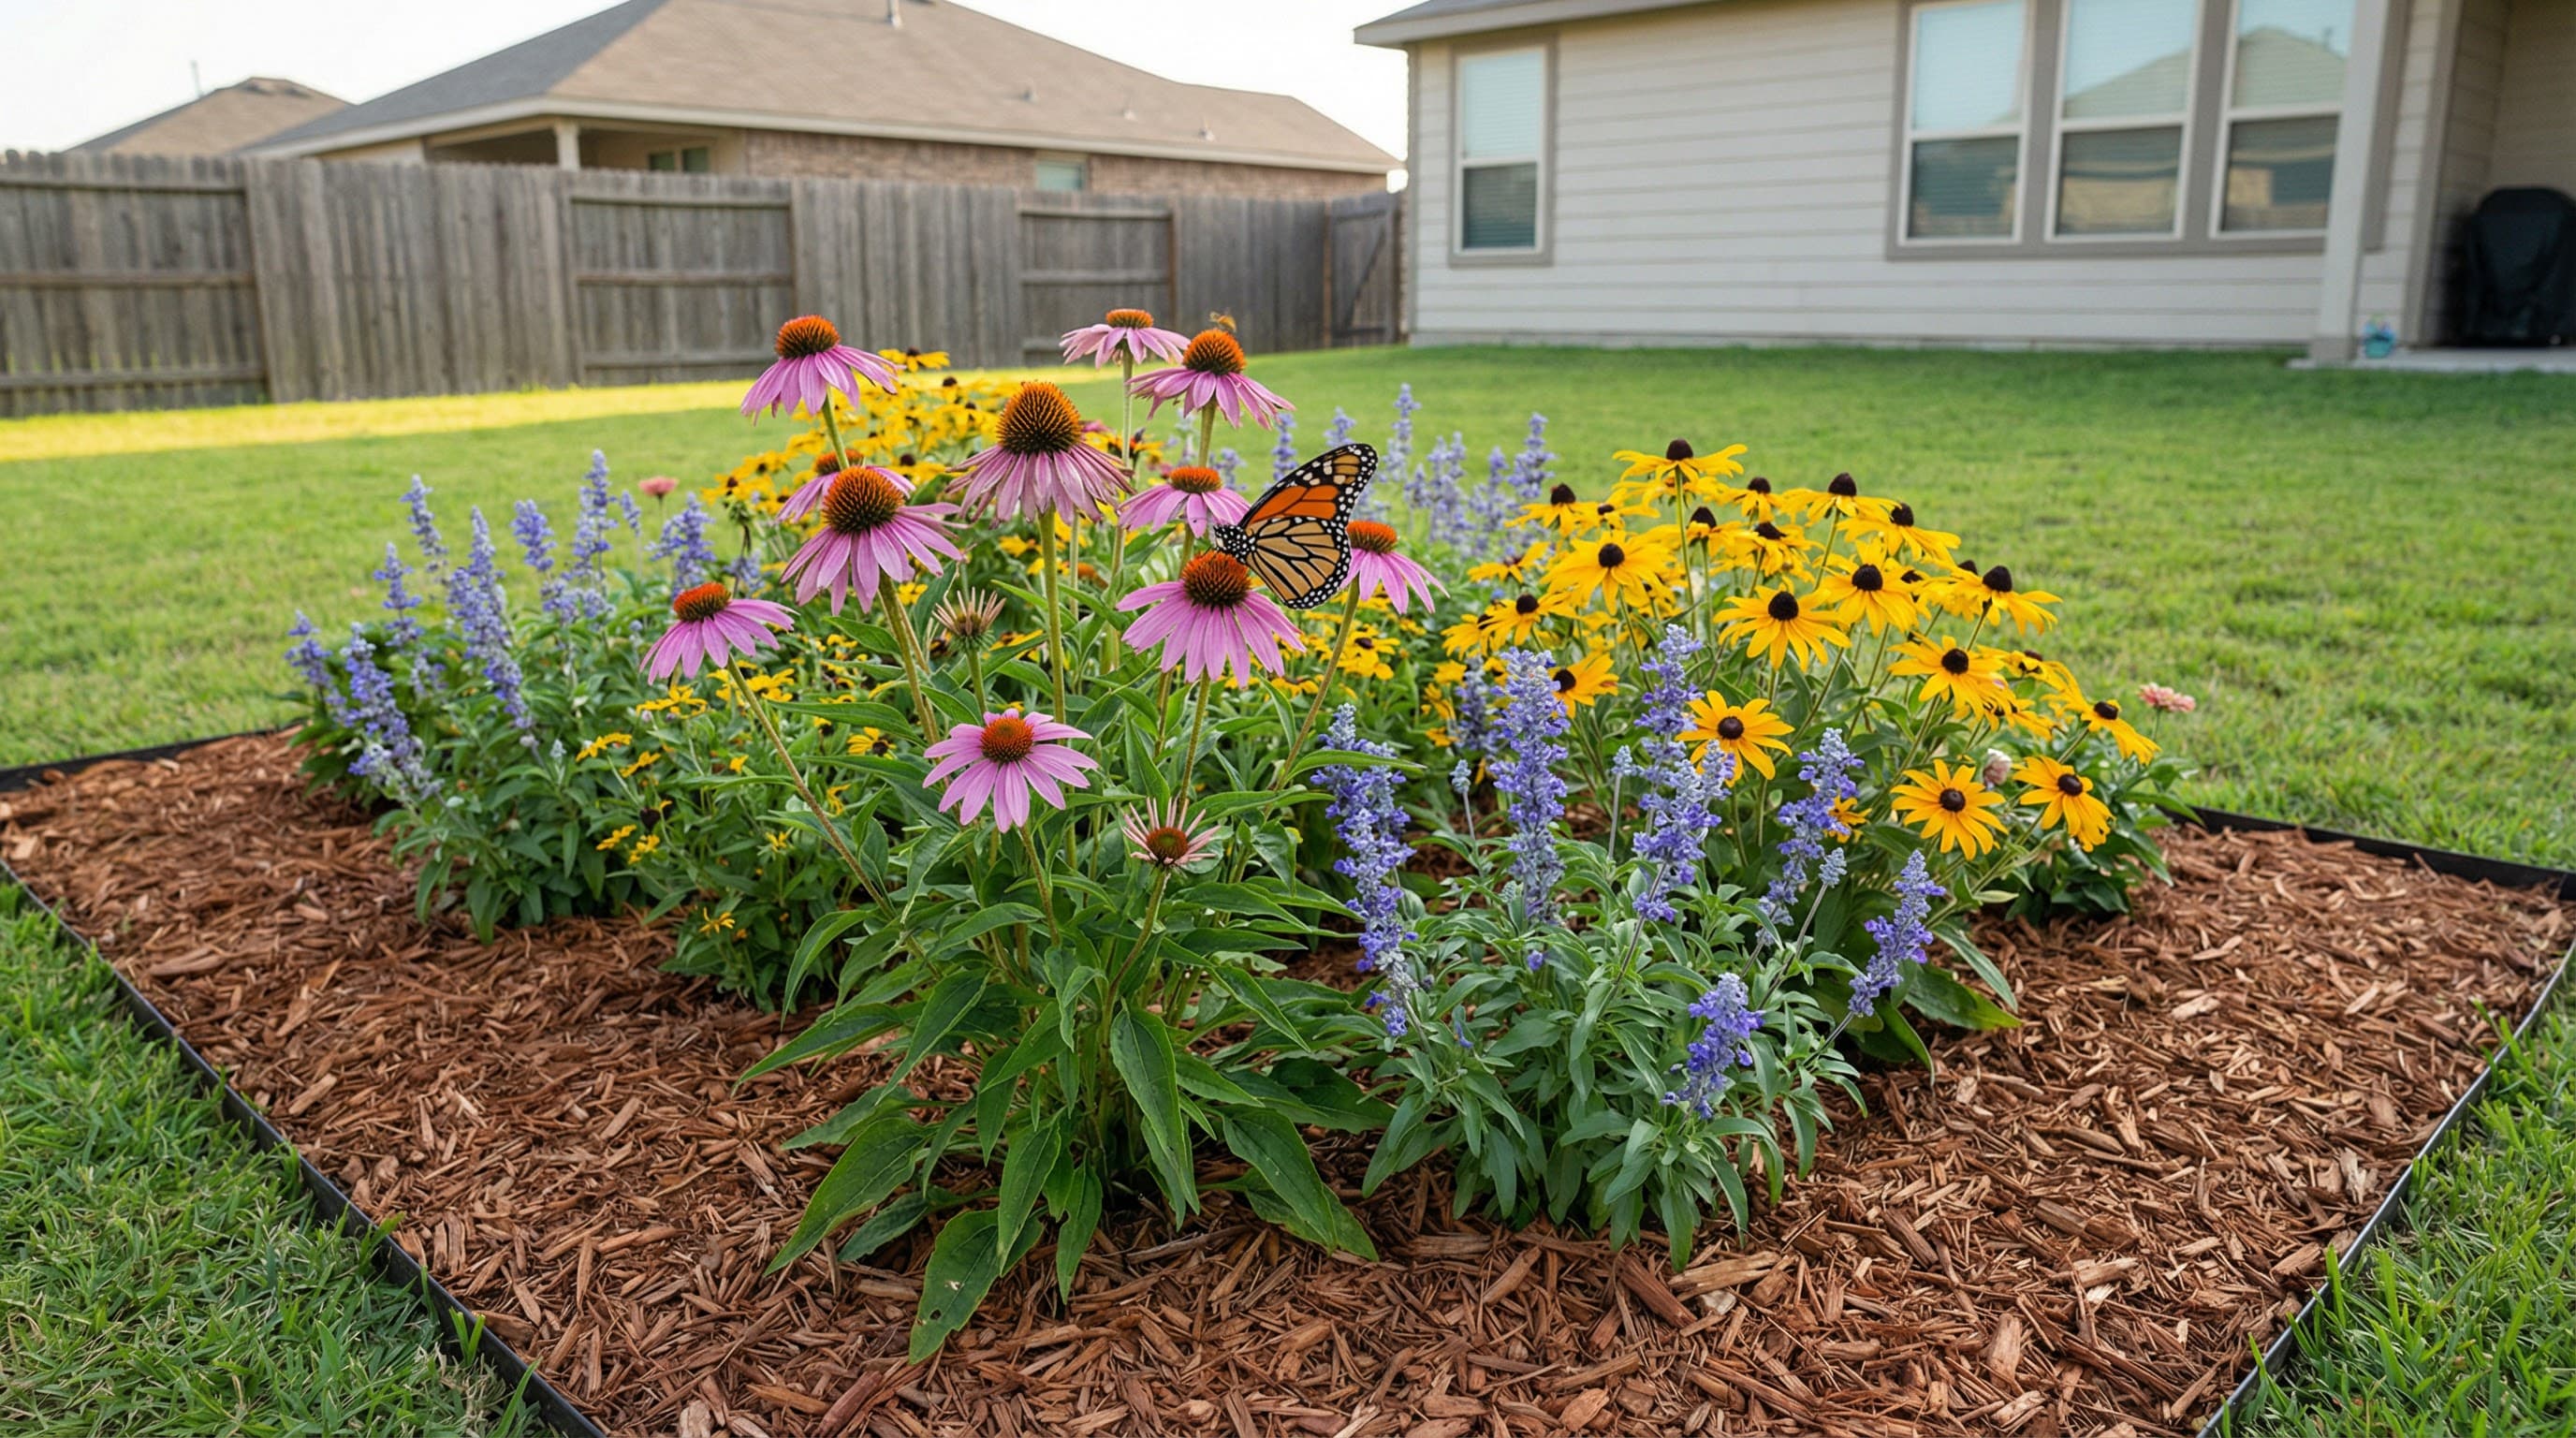
For Texas, strong pollinator patch choices include:
- Black-eyed Susan (Rudbeckia hirta): 1-3 ft, yellow blooms summer through fall
- Mealy Blue Sage (Salvia farinacea): 2-3 ft, blue spikes spring through fall
- Butterfly Weed (Asclepias tuberosa): 1-2 ft, orange clusters, monarch host plant
- Purple Coneflower (Echinacea purpurea): 2-4 ft, pink-purple blooms summer
- Flame Acanthus (Anisacanthus quadrifidus var. wrightii): 3-5 ft, red tubular flowers, hummingbird magnet
- Frogfruit (Phyla nodiflora): ground cover, tiny white flowers, heavy bee use
4. Plan for three-season bloom
The most effective pollinator patches include plants that bloom in spring, summer, and fall. This ensures pollinators have a continuous food source and your patch has color for most of the year.
Simple bloom planning
- Spring: Mealy Blue Sage, Winecup, Prairie Verbena
- Summer: Butterfly Weed, Black-eyed Susan, Purple Coneflower
- Fall: Goldenrod, Autumn Sage, Maximilian Sunflower
5. Layer by height
Place shorter plants (under 18 inches) toward the front or street side. Mid-height plants (18-36 inches) go in the middle. Taller species (3+ feet) belong in the back or closest to the house. This creates visual depth and keeps the patch looking organized.
6. Mulch and maintain
Apply 2-3 inches of mulch around plants to suppress weeds, retain moisture, and signal care. Leave some bare soil patches near the back of the bed. Many native bees are ground-nesters and need access to soil for nesting.
Pollinator patches and HOAs
The most common concern homeowners have about pollinator patches is how their HOA will react. The good news: most HOA objections are about appearance, not plant species. A well-designed pollinator patch that looks intentional rarely draws complaints.
Design cues that reduce HOA friction:
- Clean edges: A crisp border between the patch and lawn reads as "landscaping," not "neglect"
- Mulch coverage: Visible mulch signals ongoing maintenance
- Height control: Keep plants near streets and sidewalks under 2 feet
- Repetition: Planting the same species in groups of 3-5 looks deliberate, not random
- Seasonal cleanup: Cut back spent growth in late winter before new growth appears
A note on framing
If your HOA asks about your pollinator patch, focus on design intent rather than ecological mission. "It's a low-water native flower bed designed for year-round color" is more effective than leading with pollinator conservation. The plants do the ecological work regardless of how you describe them.
How big does a pollinator patch need to be?
Smaller than you think. Research from the Xerces Society shows that even very small native plantings (as little as a few square meters) provide measurable pollinator support. Here's a practical sizing guide:
- 25 sq ft (5×5): Fits 4-6 plants. Enough to attract bees and small butterflies. Good starter patch.
- 50-100 sq ft: Room for 8-15 plants with three-season bloom. Visible from the curb. Meaningful habitat.
- 100-200 sq ft: A full front-yard bed. Supports a wide range of pollinator species. Can include host plants for butterflies.
Start with what feels manageable. You can always expand a successful pollinator patch into adjacent beds.
Common mistakes when starting a pollinator patch
- Planting too many species: Start with 5-7 species. Too many creates visual chaos and makes maintenance harder.
- Skipping the edges: Without defined borders, even beautiful plantings can look unintentional.
- Choosing non-native cultivars: Ornamental cultivars of native species often have reduced nectar or pollen. Choose straight species or known pollinator-friendly varieties.
- Planting too densely: Give plants room to reach mature size. Overcrowding leads to a messy look and disease pressure.
- Forgetting winter structure: Choose at least one evergreen or structural plant so the patch doesn't look bare from November through February.
Maintaining a pollinator patch
Pollinator patches are lower-maintenance than traditional landscaping, but they're not zero-maintenance. A seasonal rhythm keeps them looking intentional:
Seasonal maintenance schedule
- Late winter: Cut back last year's growth. Refresh mulch. Redefine edges.
- Spring: Light weeding as plants emerge. Add new plants if filling gaps.
- Summer: Deadhead if desired (or leave seed heads for birds). Weed edges. Water only during extreme drought.
- Fall: Leave seed heads standing for winter interest and wildlife. Touch up mulch. Clean up any flopping stems near walkways.
Established native pollinator patches typically need less than an hour of care per month during the growing season.
Getting started with your first pollinator patch
The best time to start planning is now. The best time to plant depends on your region. In Texas, fall planting (October-November) gives roots time to establish before summer heat, and spring planting (March-April) works well with regular watering.
A practical first step:
- Pick a sunny spot in your front yard, 25-50 square feet
- Define the border with edging or a clean spade cut
- Choose 5 native plants with different bloom times
- Group each species in clusters of 3
- Mulch around them and water weekly until established
Within one growing season, you'll have a defined, attractive planting that supports local pollinators and adds year-round interest to your yard.
Want help choosing the right plants for your pollinator patch?
Pollinator Patch helps you pick regionally native plants that work for your yard, your climate, and your HOA, with layout suggestions designed to reduce risk and look intentional.